
Sketchup tips
Sketchup is Great tool to make easy and also more complex game assets. Depends on your skills and also on number of the plugins you have installed in your Sketchup version. Some makes this software really powerful. This tutorial is separated into two parts. In the first one I will tell you how to make your models optimized to save polygons and kilobytes. I will show you some useful tips what to do and what not.
In the second part I will give you my own list of plugins I use for my work and links where to obtain them. Also some tips I recommend you how to speed up your work with Sketchup.
In the second part I will give you my own list of plugins I use for my work and links where to obtain them. Also some tips I recommend you how to speed up your work with Sketchup.
1) How to make 3D models optimized
3D modeling is a creative activity. Author can make bautiful model in two versions. First will have after export 5 MB and the second will have only 600 kB. But in the game both will look the pretty same. So where is the difference? I hope I musn't explain that smaller model is better, because it uses less PC resources. So you can add into the layout more models and fps (frames per second) will not drop down. In the opposite way you will add 10 models and game will become unplayable.
I know a lot of us have powerful modern computers with high end graphic and 20 core processors (irony), so some may say, where is the problem? True is that not everybody has such PC yet, and even so it is always better for you as modeller to do your job well. And this means you should try make you models as perfect as you can. This also means to make them small, nice and undemanding.
Here I bring my own tips how to keep your models in low kB counts.
- Make Low poly models
Or we can also say, make as simple mesh, as you can. Let's see what happened when you export simple rectangle face.
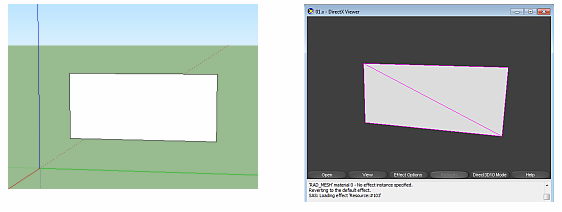
In Sketchup you can see only one face.
But if you open your exported mesh in some Meshviewer, and apply edges, then you can see that mesh has split into two triangles. The same makes each game or application. Divides whole mesh into triangles.
If we talk about mesh quality then we talk about "how many trangles it has"
This exported X file has 4kB.
Let's see another example with a circle face. In sketchup Each time you select circile tool, in the bottom right field you can select how many segments is should have. In the following picture I used a circle with 12 segments. Although it looks like a simple one face (surfaces are called in SKetchup simply - faces) so also here are after export many triangles . None vertex can remain alone. Each must be connected and to be a part of a triangle.
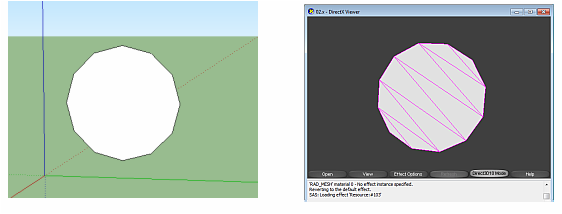
This circle face has 5 kB after export into X file.
More segments you will use, more rounded shape will have your model, but also more kB will have your total model.
Here I will show you how big diferences are among simple cube, cylinder and rounded cylinder. Both cube and cylinder have been made by pulling using the tool "push/pull" But the rounded cylinder I made by the "Follow me" tool via a curve. The curve has seven segments. and cicles I pulled had 12.
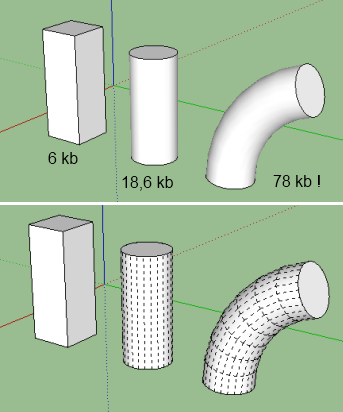
On the picture we can see how dramatically increases file size by using the curved faces with many polygons. More complex mesh means more PC resources must be taken to calculate your model in the game. Here comes the tips:
Most simplest face is a rectangle.
If you wanna use circle or curve tool, always select low number of segments. In most cases it is enough to have circle with 12 segments max. Sometimes it is even 10 or 8 segments enough.
Complex and curved parts keep in low poly's and avoid doing too dificult mesh!
Instead of making rounded effect by a lot of polys, use this smoothing method and create simple mesh.
Keep in mind how 'big', or small will be that or that part on your model. If ir is a roofing of your train, which will be seen the most time, it is better to model it nice and with more polys. But if you gonna make bumpers which are too small in game, it is very enough to make tham very simple by using only few polys. Think during your modeling and try to keep polys as low as possible.
Use this simple rule: Texture is always more important than the shape of your mesh. Nicely painted texture makes your model more realistic than high poly mesh or too many modelled details.What can be painted, must be painted and not done by polys.
- Make unbroken (intact) faces
One image tells you more than thousand words.
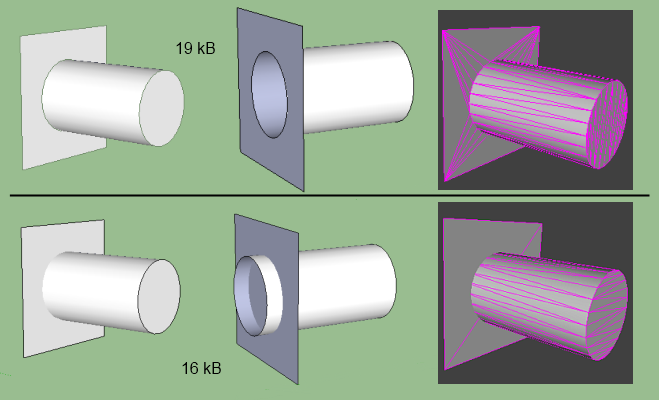
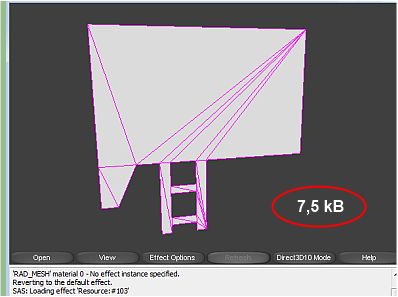
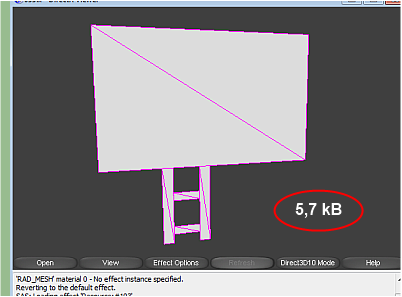
If you try to make this model in Sketchup, you will probably use the classic method by pulling up the circle from the square by push/pull tool. Well it's ok. But this means, that the cylinder begins in the square. And when you export this model, you will see that your mesh has much more triangles than you had thought.
Let's think another option, you will pull up the circle but then you will pull up also the other end to move it further behind the square face. As you can see on the example in second raw. In this case the square face is not broken, remains intact and NO triangles are created when exported ! And this is COOL method how to keep your model clean and small.
Yes, you can say, there is only 3 kB difference between both methods, but you must count that your model will have a lot of such cases and in the final it can give you calmly 150 kB (!) And this is yet valuable size.
Remember that not only faces, but also edges can be broken. If your lines begins in the middle of other lines, than also these points will broke the faces and make new triangles. See next images:
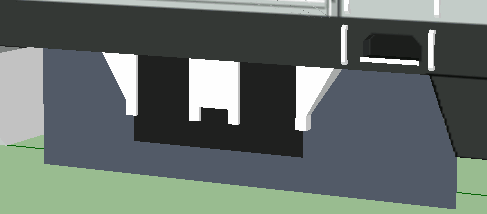
In this case "steps" are attached to the bottom line. Edges are connected.
|
In this case there is a Gap between the train and the platform, oh no, between the steps and the bottom line
|
So it's good idea create separated faces, keep them intact and give no opportunity to mest to create any triangles. Keep it simple, separated and everything will be fine. Yes such modeling takes more time, but you will see that you will be more happy with such results.
- Use Alpha in your textures
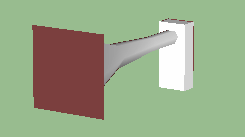
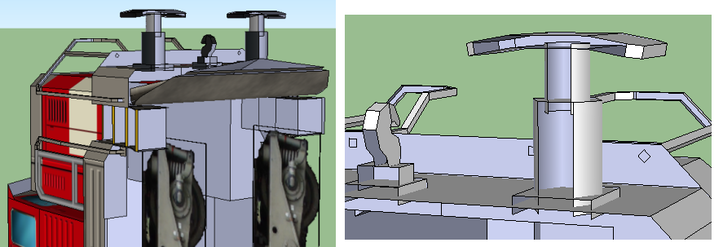
Alpha is meant to be those parts that will be empty in your game. So till now you could make circle only by mesh with many segment lines. But with Alpha you can make also circled shape, and your mesh will be composed wih only two triangles.(!) Do you not believe? Oh Jesus, yes! and open your eyes to see following gif animations. The bogies on the image is done with two faces. Main bogie and chasis which is little bit more in the front of. So it makes a spatial effect when rotating camera around model.
The second animation is the horn, and circle shape is represented by the alpha image placed on the square face (two-triangles) mesh. Just think about the option it would be made by polys. And tried to keep such smooth shape. You should have at least 24 segment of the curve. This is absolutely unnecessary. Use Alpha everywhere where you can !
The second animation is the horn, and circle shape is represented by the alpha image placed on the square face (two-triangles) mesh. Just think about the option it would be made by polys. And tried to keep such smooth shape. You should have at least 24 segment of the curve. This is absolutely unnecessary. Use Alpha everywhere where you can !
- Delete all non-visible faces
The game Rule the Rail is made in such way that is impossible to look at the models from below. So here comes the idea to delete all faces which are at the bottom and invisible on your model in game.
Delete not just the faces but also the connected edges. keep only such faces on your model, which are important and visible.
Delete not just the faces but also the connected edges. keep only such faces on your model, which are important and visible.
On the right bumper image, see how the faces are extended behind to keep the other faces intacted. All bootom faces are removed.
- Wagon windows done by alpha
|
This chapter is in fact an example how you can also use the alpha on your model..
Let's take a typical case. Side walls of your wagon are fitted by the windows. The first way how to make them is to paint some rectangles with rounded corners by using lots of polys. This must be done, because you wish to have windows shining in the night. So to apply different texture you must separate it by lines and edges. But really? Consider also the option to use the alpha. The side face is only rectangle shape and the texture mapped on it is with alpha in the places where the windows should be. Little bit behind this face will be another rectangle face with texture mapped with painted windows. This texture is different and will be loaded in your ltex.list file to shine in the night. |
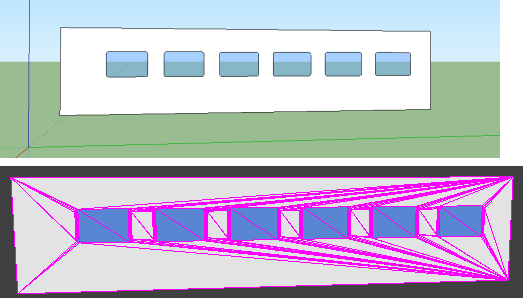
Example of windows made by polys. Many many many triangles are created and of course this increase the final model size a lot.
|

Just see these both images. Only two faces and ONLY 4 triangles to compute in your game.
Take care to adjust the proper distance between those two faces. Too close each other it will flicker in the game, too far away you will see the gap between them in the game. In proper distance everything it's OK and noone can recognize that windows are done by Alpha. the final word
|

|
All these methods mentioned above can rapidly decrease the final model size. We are talking about hundreds of KB's. For example an Engine of cd754 I done in my very beginnings was more than 2.2 MB big. The second version I released has been optimized by all these tips and I reduced the size up to 600kB. While I added some new details. That is a noticeable reduction and the PC resources will thank you for such optimized models.
Dear modellers, I wish you all the joy from the modeling and also nice models with few kB's.
Dear modellers, I wish you all the joy from the modeling and also nice models with few kB's.
2) Sketchup Plugins and some workflow tips
I would like to recommande to all to use plugins. It improves the Sketchup a lot. With plugins you will be able to work quicker, more effeciently and will be able to do more difficult shapes. Here is my list of Plugins I use in my work. Read my short description of usage and click the name of plugin to be relocated to the download site. For comprehensive description find the plugin in the SketchUcation store pages.
TIG: Mirror v3.8 - Mirror objects, - to one, two, or three points you will select. You are choosing the axis to mirror. This is very used by me very often.
TIG: TIG-weld v1.0 - This welds the vertices on the edges, so the line is then connected. If you are going to pull up such curve, the face will be smoothed. In the case you will pull up the not-welded curve, it will have sharp edges. Very useful.
Fredo6: Joint Push Pull - Improved Push Pull tool. You can pull more faces than only one. You can pull curved faces, and or, pull via some lines.
Fredo6: RoundCorner v2.5a - Makes corner edges rounded. Ideal to round more edges together, like on the cube for example.
Fredo6: Curviloft v1.2d - Great tool to make curved and all the difficult faces you are not able to do in original Sketchup. So called Must have.
TT: Clean Up 3_1 - IT Cleans your model / mesh. Cool and well working plugin which makes your models clean and perfect.
3D Rad Exporter - this is the one which is necessary for you, if you want to export in Direct X format.
ENEROTH: Extended delete - Awesome improved eraser tool by wonderfull Christina. If you select the face to delete, then it erase also the connected edges. SO you mustn't anymore to delete them manually.
ENEROTH: EdgeBreaking - Another cool plugin by Eneroth, If applied, than you can croos the edges and they will stay intact, not broken by each other. Very useful !
Karel: FlipBacks - This is the TIG's plugin which I little bit edited, It Flips the faces from the back faces to front face and contrary. (The same action as you choose the right mouse button and select "Reverse faces") BUT - with the Awesome difference that you dont Need to click RMB and search for the item, because this plugin can have assigned a key in your shortcut Preferences menu. SO the process is simple: Just select the face, and press the mapped key shortcut on your keyboard and the face will be reversed. FInally something really quick !
Karel: Export Import textures - Again my own correction of TIG's plugin. Two icons in you software. One for exporting and another one for importing of texture. Plugin will create a new folder in the place where you have your SKP model saved. This folder will be called: "Textures" and here it puts all the image texture which are already mapped on your model. If you press the Import icon, the plugin reads all those textures in the folder and reload it on your model. So If you made some changes to the texture in Image editor and saved such changes, Then just press the import icon and Your model will update the textures. I use this for my work permanently. Note, that functions can be mapped to key shortcuts, for better use.
Note: There is for sure a lot of any other plugins out there, but these are the most used by me. Many more you can find out at: www.sketchucation.com
Speed up your workflow !
I will say just three words: USE SHORTCUT KEYS !
In the very beginning prior to you to start model anything, go to the menu - Window / Preferences / Shortcuts and assign your own keys for almost EVERYTHING.
For example I assigned also keys for camera rotating, pan, and perspective/paralle projection. These are the 3 mostly used functions and I selected Z, X, C keys for them. So I can just press C and use left mouse button to rotate the camera view. Then X for panning (I hate the middle mouse button for camera usage) and Z to switch between paralel and perspctive projection.
This is very quick because I dont need to move my mouse to the icons in the toolbars to switch the functions.
I have shortcuts for everything: For exporting into X format, for Reversing the faces, for deselecting all (select none), for Undo function, because In Europe the Z and Y are switched, so Ctrl +Z is too far for us, so I adjusted UNdo for Shift D, which is better, ...
I have shortcuts for Importing the textures ( - see my own plugin), for changing the edges view style (Show edges, or not, show hidden edges, or to show profiles, etc...)
With all these, my left hand just press the propriate keys and the right hand performs the actions with mouse directly on the model. Please, dont loose the time by searching and clicking the icons in the toolbars. Or even going to the menus, Thats against your workflow speed
Hope All these tips were useful for you and I could help you with your own modeling. Looking forward to your new better models. Karel
