
How to smooth edges, or I call it "the final optimalisation"
Dear modellers and colleagues in making stuff for Rule the Rail game. If you also work with Sketchup software, then you must face to the same problem as me. That edges smoothed in the Sketchup are not smoothed in RTR. They are sharp refracting the light into two separated faces. Let's look at following picture, what I mean.
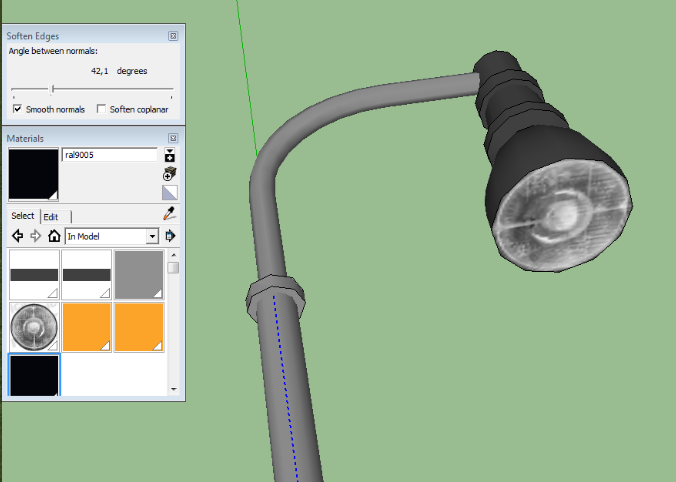
This is the very classic example of model made in the SKetchup. The cylinder has been created by pushing the circle with "Push/Pull" tool. The lamp cover has been created by "Follow me". I rotated the profile around the circle.
As you can see, there are TWO types of edges in SKetchup.
The first ones are visible, firm, painted by solid black line. These edges make the faces separated. The second ones, are invisible (in normal view) and they are so called: Smoothed. To show these type of edges, you must go into the Menu/ View/ Hidden geometry. The edges will show up as dashed lines. These smoothed edges make the faces unite and normals of two adjacent faces are shared. So the light falling on the model makes effect of one united curved face.We cannot see more separated flat small faces, but we see just one, curved face.
By clicking on such face, you will select the whole area bordered by the firm solid edges, although inside of such area may be more hidden, smoothed edges.
Each type of the edges can be converted to the opposite one. Select the dashed smoothed line by right mouse button, and choose "Unsoften". The line becames solid and the edge is now firm. If you wish to make it smoothed again, go to the main menu and select: Window / Soften edges.
New window will open and move the slidebar to the right until the edge will smooth. Check that "Smooth normals" is thicked in the window.(like on the picture above). When smoothing you can see that the shape of the model changes, the faces becames more rounded.
If "Smooth normals" is unchecked, the edge will became invisible, but the light and shadows effect will be still the same as used on firm edges. You would see the sharp edge.
Well, enough to the theory. Now let's come back to our case. As you can see, my model of lamp has smoothed faces in the SKetchup. Now I use 3dRad exporter plugin to export my model as usual. Then let's open it in RTR and watch what happens. We can see the same model, but edges smoothed in the Sketchup are now firm and sharp in the Game !! See the pic.:
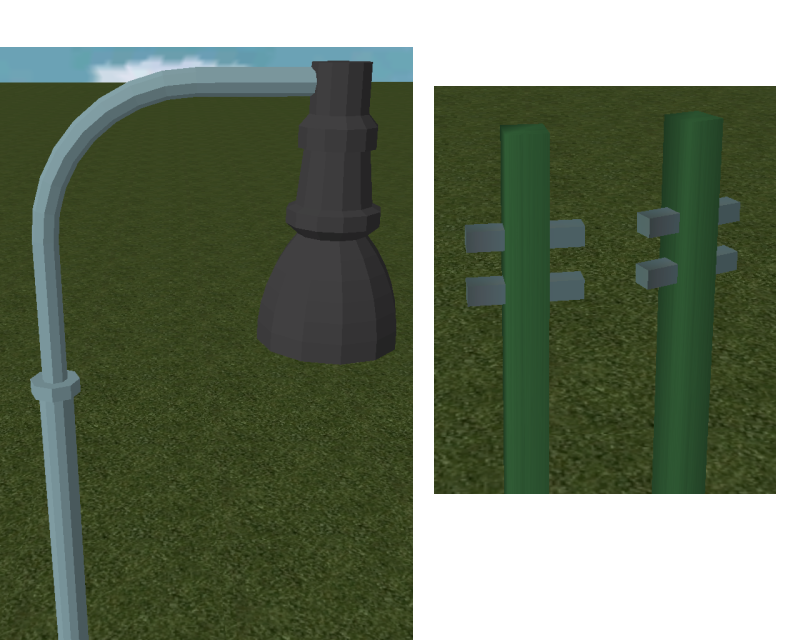
There are visible sharp edges on the whole lamp. If we wanted to create nice models for the game, we had to make them high-poly. A lot of polygons imitates the smooth shapes. But of course this method increases the file size and takes more from PC resources.
Just next to the lamp I attached an image of Dave's catenary model. His model is made just as 4-sided prism and looks almost better than my lamp made of 12-segments circle. It is due to weld normals on the edges. Dave's edges are smoothed.
And this is our task.
Dave used different software (I guess Anim8or) which exports models exactly as they were built.
Sketchup is different. Although this software is enormously easy to use, the X format support hasn't been yet implemented. We must use 3rd party plugin, to export our models into direct X format.
I still use the: 3d RAD Exporter plugin, which is not so perfect, as we would need to. He has two weaknesses. Especially these "not" smoothed edges, and the issue with flipped YZ planes. For which we must flip our models along the red axis prior to export. If we got better plugin, both problems would be solved. Time by time I look for better plugin, but still nothing found. This one is still the best I know. Once I discover better I will give you know, be sure!
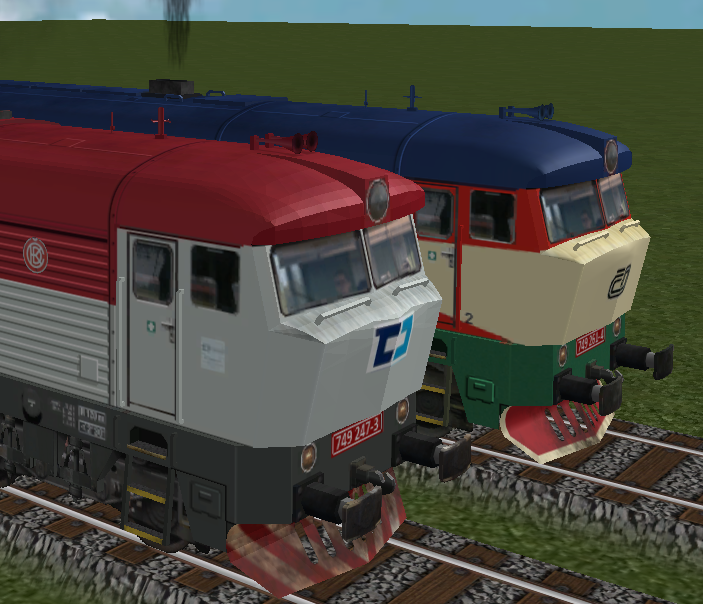
Until that we are supposed to use the plan B, which means how to make the Sketchup models with smoothed edges also in the Game. For example like the second engine on the image below:
Just next to the lamp I attached an image of Dave's catenary model. His model is made just as 4-sided prism and looks almost better than my lamp made of 12-segments circle. It is due to weld normals on the edges. Dave's edges are smoothed.
And this is our task.
Dave used different software (I guess Anim8or) which exports models exactly as they were built.
Sketchup is different. Although this software is enormously easy to use, the X format support hasn't been yet implemented. We must use 3rd party plugin, to export our models into direct X format.
I still use the: 3d RAD Exporter plugin, which is not so perfect, as we would need to. He has two weaknesses. Especially these "not" smoothed edges, and the issue with flipped YZ planes. For which we must flip our models along the red axis prior to export. If we got better plugin, both problems would be solved. Time by time I look for better plugin, but still nothing found. This one is still the best I know. Once I discover better I will give you know, be sure!
Until that we are supposed to use the plan B, which means how to make the Sketchup models with smoothed edges also in the Game. For example like the second engine on the image below:
Fragmotion, the miracle from heaven
Ladies and Gentlemen, let mi introduce another software you will need to use for your work. It is called: FRAGMOTION
Besides it is primarily focused on skeleton animation, this program is also great for some X file modifications without conversion to other format. Fragmotion can work with direct X format by using Import / Export functions. In basic version it's free. Only typing of the "Lords prayer" by keyboard will be requested once a week. This can be done, I hope :-)
System of panels and common usage of this software is little bit different compare to for example Sketchup, but this can be learned. There are some learning tutorials on their sites. Once you get familiar with it, you will realize that this soft has really a lot of useful functions. Now, let's go the procedure to finaly get smoothed model in RTR.
Procedure:
1) Export your model from Sketchup as usual. You will get X file.
2) Open Fragmotion. Go to the menu and select: File / Import ....and choose your x file you just made by sketchup.
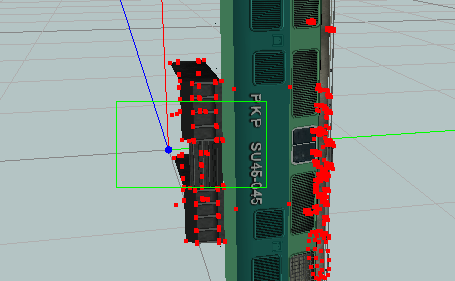
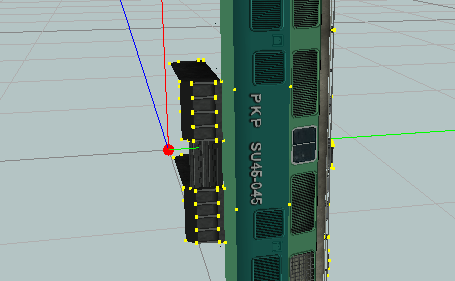
3) You can rotate your model by the right mouse button. In the upper icons you can switch different views, styles, etc. When you already played with this enough, go to the right panel, called Tools. Unfold Select, and choose: Select Bone . The title "Select Bone" will be highlighted by the blue background to get you know, you just selected it. See first image in the following gallery.
Now go with mouse to the center 3D view panel, where you can see your model. Press left mouse button and pull a rectangle around the center to select all blue bones. See the second image.
And finaly, once selected, press Delete on your keyboard, to erase all the bones.
The third image shows selected bones just prior the erasing. Notice that bones turned into red color. After deleting even this red dot must disappear.
2) Open Fragmotion. Go to the menu and select: File / Import ....and choose your x file you just made by sketchup.
3) You can rotate your model by the right mouse button. In the upper icons you can switch different views, styles, etc. When you already played with this enough, go to the right panel, called Tools. Unfold Select, and choose: Select Bone . The title "Select Bone" will be highlighted by the blue background to get you know, you just selected it. See first image in the following gallery.
Now go with mouse to the center 3D view panel, where you can see your model. Press left mouse button and pull a rectangle around the center to select all blue bones. See the second image.
And finaly, once selected, press Delete on your keyboard, to erase all the bones.
The third image shows selected bones just prior the erasing. Notice that bones turned into red color. After deleting even this red dot must disappear.

- Fragmotion automatically adds skeleton bones to your every model which you open in the program.
- This bones are shown as dark blue bold dots.
- They are inserted in the center of coordinations.
- Once you selected them, they change color to the red
- Once you erase them, on the left panel called: Skeleton, will be all data erased. Only Skeleton name remains, and the rest of panel will be empty. See the gif animation: (After deleting bones the Skeleton window should be empty like on the pic.)
Info: The verteces are yellow or red depending on your View status. At the top menu you can check or uncheck this icon: "Show Bone Assignments with Vertices (Alt+C)" After you deleted bones the Vertices must be only yellow.
4) Go to the menu, and select: Vertex / Weld All
New window will appear to ask you for the tolerance. Leave the value which is predefined. (There should be 4 zeros, behind the comma)
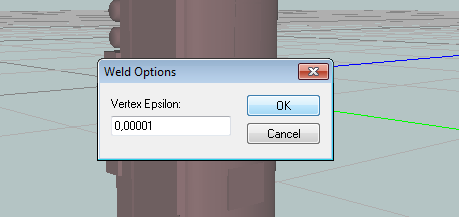
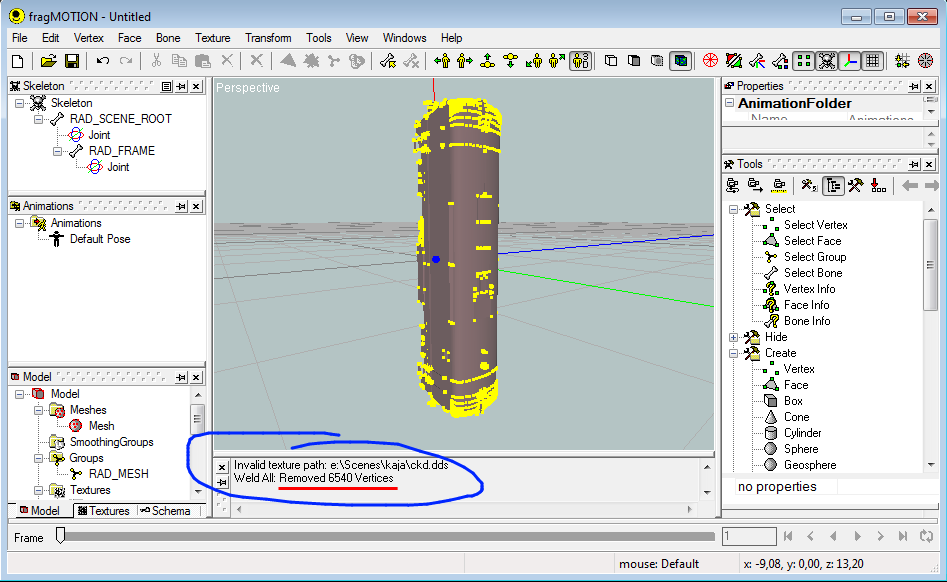
Once you pressed OK, at the bottom line you can read how many verteces has been removed.
In our case it is 6540 verteces. It is a lot. And this will have impact on the file size. Our file will be lighter by hundreds of kB!
5) It is time to save your model.
Go to the menu: File / Export ... and select format: Direct X Files (.x)
Window with settings will appear. Here you can uncheck all the options to leave it as the picture shows:
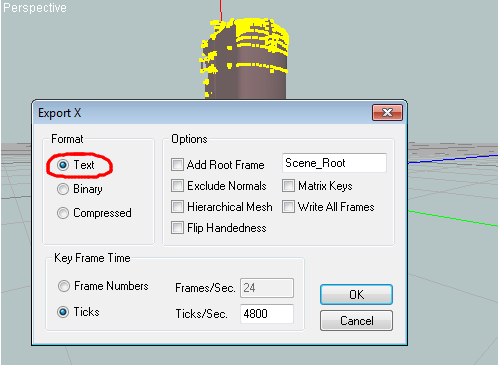
TIP ! - Notice how the file size has been reduced by huge 300 kBs !
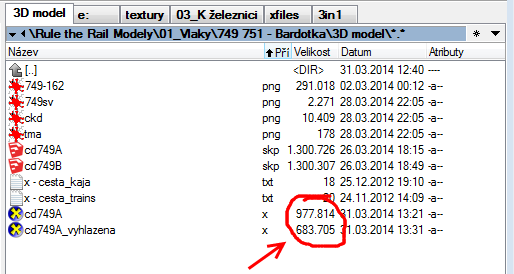
Let's have a look what we have done. Open your both X models in MeshViewer software. The X file before welding (cd749A), and the same model after welding (cd749A_vyhlazena). In the menu click on the "C" icon, to show the Creases (yellow lines). Or press the keyboard shortcut "r".
All the firm edges on the model will highlight by yelllow. All these edges will be "sharp" in the game. Everything else will be smoothed.
All the firm edges on the model will highlight by yelllow. All these edges will be "sharp" in the game. Everything else will be smoothed.
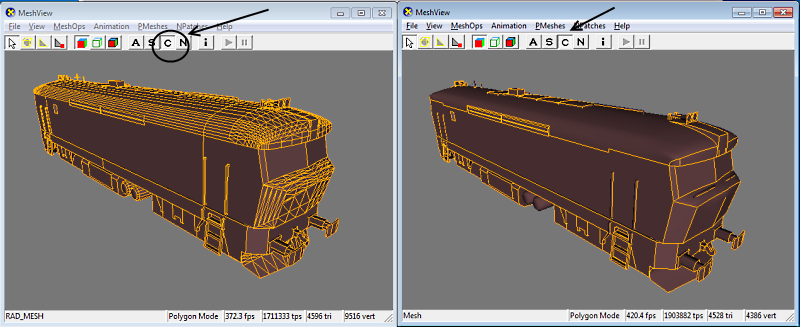
On the left: Model exported from the Sketchup < < < > > > On the right: Model smoothed in Fragmotion by "Weld all" function
INFO: It is important to know, what welding operation does with the model. Fragmotion smooths exactly such faces, which were smoothed also in the Sketchup! For example roofing, plow or buffers.
INFO: It is also important to know, which edges will stay firm. All the edges, which were firm in the Sketchup, will be firm also after welding. But be aware !! - There is one exception, when the firm edge can be also turned into smoothed one
This case concerns the edge, whose faces are coplanar and simultaneously both are mapped with the same texture projection. The texture information is important for Fragmotion processes.
On the contrary, if you have smoothed edge in the Sketchup, but both faces have different texture projection (the texture is not related (continuing)) then Fragmotion turns this edge into the firm one. And the light effect in game will be sharp. Bcs. the texture information is different. It doesn't mean only the different textures are projected, but it can also be the case of the same texture, but somehow shifted, rotated or in other way displaced to the adjacent one.
TIP! - So remember, that Fragmotion reads the texture information and this is important to the way how it works when it is welding the verteces.
Note: Welding function doesn't work on model with no textures mapped on. You must use this function only on models, with textures applied. But don't be scarred to use this function. In the most cases the textures are on the model well projected and the result from Fragmotion is well done. But each time is good to check the results in the MeshView software. (Rotatin by LMB, panning by RMB).
6) Open your "optimalised" X file in the Notepad. You must correct the textures paths, as usual. (with the two - "\\" among folders).
Your textures are stated at the end of the document. BUT - Fragmotion exports text in "denser" style, so it takes more time to open such file for editing, and the orientation within the text is worse. Perform your editing, Save and Close.
7) Validate your model with XValidator, and you are ready to run the Game !!
Conclusion
It is time to summarize our actions: We reduced the file size by great 300 kB! And simultaneously we improved the quality by smoothing the edges.

Let's have a look at our sample with lamp model. The cover of lamp and the bottom part of stick are perfectly smoothed. The middle part I left without optimalisation to better show the difference.
It is the same model. The same number of polygons. But we only made the vertex welding with Fragmotion.
Not only it looks much better, but more it allows us to create in Sketchup much simpler shapes and models. Because the "roundness effect" will not be anymore done by the number of polygons, but by welded verteces and common normals of smoothed edges.
We are allowed now to create the same lamp by using much less number of polygons. Then to smooth it with Fragmotion and the final product will look with the same quality. And simultaneously will be simpler for PC resources. And this is the crusial principle of any 3D modelling.
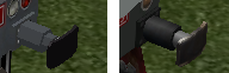
To have another comparison I use the engine buffers: Both are the same model. Both were created by pulling out the 6-poly circles. On the first one you can see the sharp edges. On the second one you have perfect illusion of rounded cylinder. Although it has ridiculous 6 faces !
I am sorry for the small images, but this it the size how you can see this parts in the game.
I am sorry for the small images, but this it the size how you can see this parts in the game.

Model of cd749 Bardotka after Fragmotion optimalisation.
